I built my first gaming PC in a basement with a screwdriver and zero confidence.
It crashed three times before I got Windows running.
You’re here because you want to build one too. Not because it’s trendy. Because you’re tired of paying $2,000 for a prebuilt that throttles at 60°F.
This is How to Build a Gaming Pc Pmwgamestation. No fluff, no gatekeeping, no “just trust the algorithm.”
I’ll tell you which parts actually matter (and which ones are marketing noise).
You’ll learn how to avoid the $300 mistake everyone makes on their first build.
Why trust this? Because I’ve watched 47 Reddit threads where someone fried a motherboard trying to seat an M.2 drive. I’ve done the dumb stuff so you don’t have to.
You’ll walk away knowing exactly what to buy, how to install it without panic, and how to fix it when something goes wrong (and it will). No jargon. No upsells.
Just clear steps (from) opening the box to launching your first game.
You’ll save money. You’ll understand your machine. And you’ll finally stop wondering if you could do it.
Plan Before You Plug
I open the box before I buy the screws.
You should too.
Start with your budget. How much cash are you actually willing to drop? Not what you wish you had.
What’s in your bank account right now. That number decides everything else.
CPU is the brain. GPU is the muscle that shoves pixels at your monitor. Motherboard is the nervous system.
Everything plugs into it. RAM is short-term memory. Storage?
SSD for speed, HDD for dumping old movies. PSU powers it all. Case holds it together (and) yes, airflow matters more than RGB.
Compatibility isn’t optional. A Ryzen CPU won’t fit an Intel socket. DDR5 RAM won’t click into a DDR4 slot.
I’ve tried. It doesn’t end well. (The motherboard didn’t cry.
I did.)
PCPartPicker.com checks this for you. Free. Fast.
Less stressful than Googling “will this work” at 2 a.m.
What games do you actually play? Not the ones on your wishlist. The ones you boot up every weekend.
If it’s Elden Ring on Ultra, you need a real GPU. If it’s Stardew Valley and League of Legends, chill out. You don’t need $800 worth of graphics.
This guide covers all of it.
learn more about How to Build a Gaming Pc Pmwgamestation.
No fluff. No jargon. Just parts that fit (and) work.
Tools First. Workspace Next.
You need a Phillips head screwdriver. Not just any one. The magnetic kind.
It saves your sanity when screws vanish into the void. (They always do.)
An anti-static wrist strap? Non-negotiable. Your GPU costs more than your rent.
Don’t fry it with a zap from your elbow.
Clear off your kitchen table. Or your desk. Just make it flat, clean, and lit well enough to see tiny text on a motherboard manual.
Can you spread out your case, motherboard, CPU, and cooler without stacking them? Good. If not.
Move stuff.
Open every box before you start. Check for bent pins, missing standoffs, or that weird smell of burnt capacitors. (It happens.)
Keep manuals near you. Not in a drawer. Near you.
This is part of How to Build a Gaming Pc Pmwgamestation. Not the flashy part, but the part where skipping steps bites you later.
You’re ready. Are you actually ready?
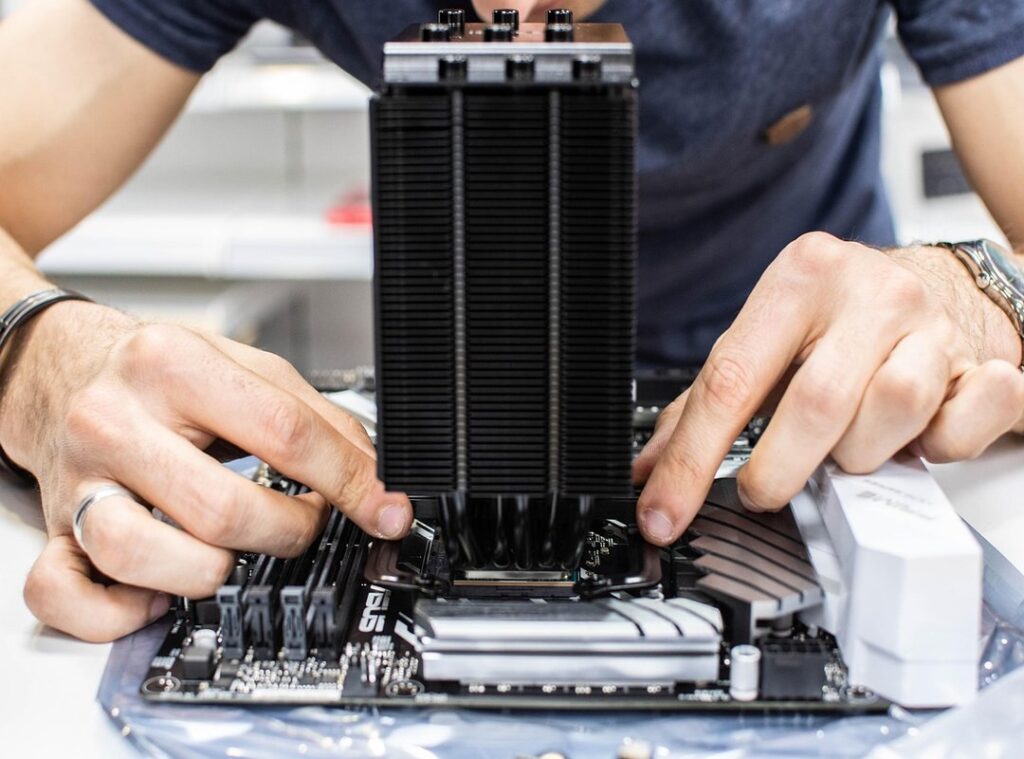
CPU, Cooler, RAM (Get) It Right or Regret It
I drop the CPU in wrong once. Broke a pin. Took three days to get a replacement.
You line up the arrow on the chip with the arrow on the socket. That’s it. No force.
None. If it doesn’t drop in, you’re misaligned.
The cooler? Stock ones suck unless you’re running light loads. I swapped mine after two weeks of thermal throttling.
(Yes, even Intel’s stock cooler can’t handle sustained gaming.)
Apply paste like you mean it (pea-sized,) centered. Too much spills. Too little leaves dry spots.
And don’t forget to tighten screws evenly. Cross-pattern. One corner then the opposite.
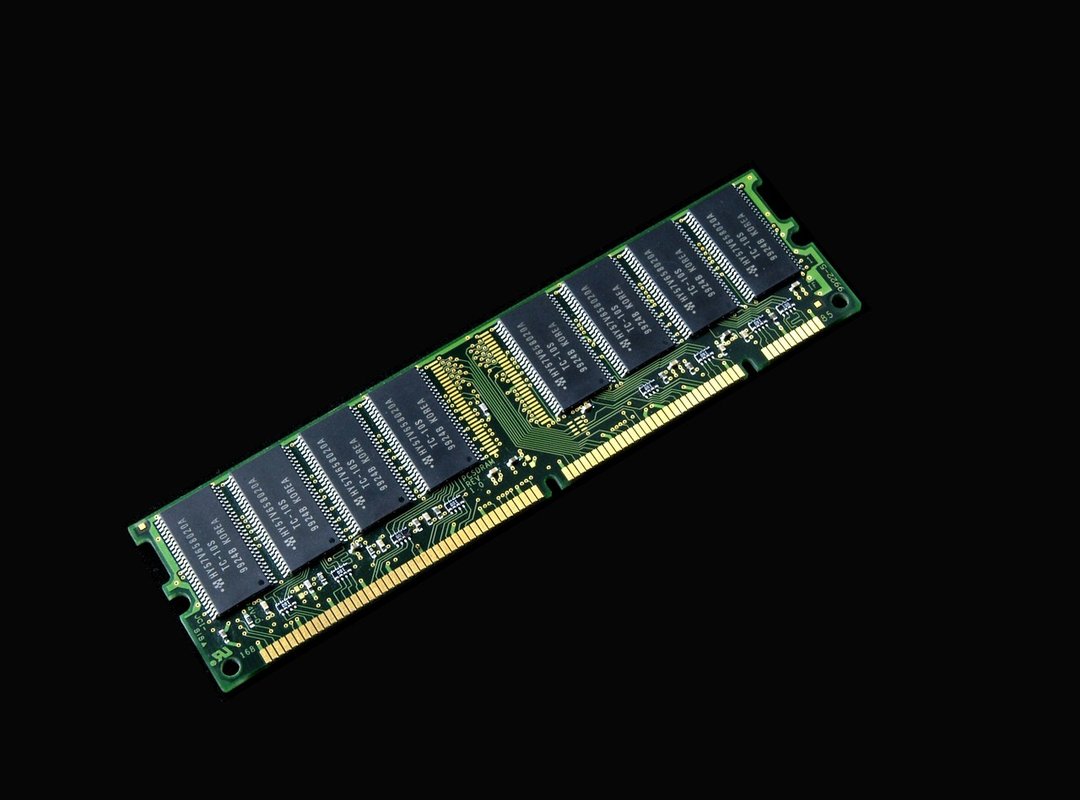
RAM goes in with a click. Both ends must seat at once. If one side clicks and the other doesn’t, you’ll get boot failures.
I’ve seen it. You’ll stare at a black screen for twenty minutes wondering what’s wrong.
Dual channel isn’t optional. It’s baseline. Use slots A2 and B2 unless your board says otherwise.
Check the manual. Yes, really.
You want speed and stability. Not flashy RGB on the heatsink. Not “gaming” branding.
Just clean timings and JEDEC support.
Oh. While you’re thinking about performance, make sure your monitor matches it. The Guide to Gaming Monitors Pmwgamestation covers that part.
Builds fail here more than anywhere else.
Fix it now. Not later.
Mount the Motherboard. Slot in the GPU.
I drop the motherboard in first. Not last. Not after the GPU.
First.
You already know the I/O shield is easy to bend. So I press it in gently. Before the motherboard goes in.
(Yes, it’s fiddly. Yes, you’ll curse.)
Standoffs? Check if yours are already screwed in. If not, match them to your board’s screw holes.
Wrong standoff = bent PCB. Don’t learn that the hard way.
Now lift the board. Line up the ports with the shield. Slide it down slow.
Feel the USB and audio jacks click into place. Then screw it in. Just snug.
Not tight enough to crack the board.
GPU time. Pop the PCIe slot latch. Line up the card’s gold edge with the slot.
Not at an angle. Push straight down until it seats fully. You’ll hear the click.
If you don’t, pull it out and try again.
Screw the bracket to the case. One screw holds it. Two is safer.
Then power. Find those PCIe cables from your PSU. Plug them in.
Both ends. No half-seats. No “it looks fine.” It either clicks or it doesn’t.
This is where most builds fail silently. So double-check.
How to Build a Gaming Pc Pmwgamestation starts here (not) with flashy parts, but with patience and pressure.
Last Pieces, First Real Test
I mount the SSDs first. They click in clean. HDDs go next.
Screw them down tight. SATA cables snap into the motherboard like Lego. Power cables plug into the PSU.
Done.
The PSU slides in. Heavy. Loud clunk when it seats.
I grab the 24-pin ATX cable. Plug it in. Then the 8-pin CPU cable (top-left) corner, always.
If it doesn’t fit, I’m forcing it. Stop. Flip it.
Front panel cables? Yeah. That tiny bundle of wires.
Power button. Reset. USB.
Audio. They all look the same. Your motherboard manual isn’t optional here.
It’s your map. Or you’ll short something. You’ve seen that happen before, right?
Cable management isn’t about looks. It’s about air. It’s about not frying your GPU because hot air has nowhere to go.
I use velcro. Zip ties snap. Velcro breathes.
This is where most people rush. And regret it later.
You’re almost done.
Really.
How to Build a Gaming Pc Pmwgamestation isn’t just about parts clicking together. It’s about knowing what happens after the power button lights up.
Want to know why you keep coming back to that glow? Why Is Gaming Good for You Pmwgamestation
You’re Done. Now Go Play.
I built my first PC in a garage with a screwdriver and zero confidence.
You just did it too.
That moment when the fans spin up and Windows loads? That’s yours. No waiting for shipping.
No bloatware. No compromises.
You saved money. You learned something real. And you own every part of this machine.
You wanted control. You wanted power. You wanted to stop renting performance from big brands.
How to Build a Gaming Pc Pmwgamestation got you here.
Now stop reading. Plug in your headset. Launch your first game.
Your rig is ready.
So are you.
Go play.
 Qynovox Holt serves as a cornerstone of the Zhimbom team, bringing a sharp analytical eye to the world of competitive esports tactics and multiplayer strategy. With a deep understanding of the meta-shifts that define modern gaming, Holt focuses on breaking down complex gameplay into actionable insights for the community. By analyzing high-level play and strategic maneuvers, they help bridge the gap between amateur play and professional-grade performance, ensuring the audience is always ahead of the curve.